Introduction
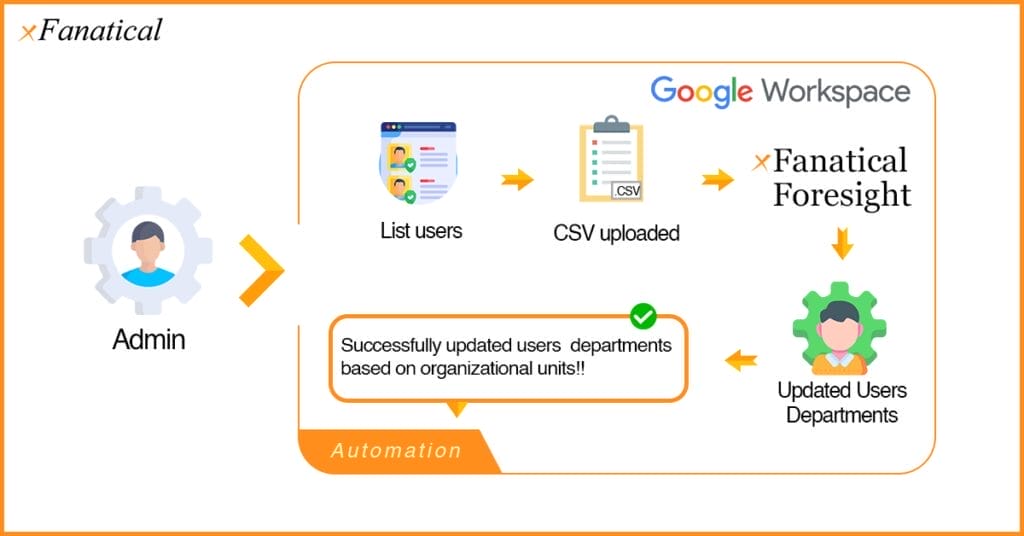
In this article, you will learn how to automatically update departments by organizational units (OUs) in Google Workspace using xFanatical Foresight. In Google Workspace, Organizational Units (OUs) and Departments are used to categorize users, manage access controls, and enforce policies. As organizations grow, manually updating users’ departments based on their OUs can be time-consuming and error-prone.
For example, when a company restructures its departments, it may need to update the department information for a large number of users. Manually updating this data would be inefficient and susceptible to mistakes. With xFanatical Foresight, IT admins can automate the process, ensuring that departments are accurately updated based on the organizational units, improving efficiency and reducing the risk of errors. This guide will show you how to set up automation to seamlessly update departments based on OUs.
Introducing xFanatical Foresight Automation
xFanatical Foresight is a powerful automation platform designed specifically for Google Workspace. It helps administrators efficiently update departments based on organizational units in bulk. This automation saves time, reduces errors, and streamlines user management by ensuring accurate department assignments across the organization.
Video Demo
Automation Setup Instructions
In this section, we guide you through the automation setup in xFanatical Foresight. We have 2 ways to set up automation rules, Set up automation from a template and Set up automation from scratch. After completing the automation rule, verify whether the automation meets your requirements.
Set Up Automation From a Template
Supported plans: xFanatical Foresight Elite plan.
To set up this automation, the admin must first extract a list of users from Google Workspace. Once obtained, the list can be uploaded to the automation rule, enabling efficient updates of departments based on organizational units.
The template is designed with two rules to simplify and streamline the organizational unit update based on departments:
- Rule 1: This rule exports all the users into a CSV file with the latest user details, including the user’s primary email, first name, last name and organizational unit path.
- Rule 2: This rule utilizes the edited CSV file from Rule 1 and updates the department information for each user based on their organizational unit path.
Rule 1: Export user’s organizational unit information
- Sign into xFanatical Foresight with your Google Admin account.
- Go to the Templates page.
- Search Bulk update department information by users’ organizational units and click on it.

- In the Templates > Bulk update department information by users’ organizational units page, click Copy Rule 1.

- For the first time use of the template rule, an dialog Action needed will display requesting necessary permissions required to copy the rule. Click Connect with Google and authorize the permissions.
- Upon authorization, a dialog titled Copy of export users’ organizational unit information will display.
- Click Next. No configurations required.
- Click Review.
- In the Review screen,

- In Rule name, customize the automation rule name.
- Click Create.
- The rule is created in the Rules page.

xFanatical Foresight rule graph for exporting users’ organizational unit information in Google Workspace.


Rule 2: Bulk update department information by users’ organizational units
- In the Templates > Bulk update department information by users’ organizational units page, click Copy Rule 2.

- Click Next.
- Click on If action.
- In the Edit actions > If screen,

- Rename each branch according to the organizational unit.
- In the Add condition field, select Org Unit Path as the field, choose text starts with as the operator, and enter the matching OU path as the value for each branch.
- In the Add next action field, select the Update employee department action to update the department according to the OU path for each branch.
- Click on Update employee department action.
- In the Edit actions > Update employee department screen,

- In the Department field, select the desired department mapped to the organizational unit.
- Click Review.
- In the Review screen,

- In Rule name, customize the automation rule name.
- Click Create.
- The rule is created in the Rules page.

xFanatical Foresight rule graph illustrating the automated updating of department information based on Organizational Unit path in Google Workspace.


Set Up Automation From Scratch
Supported plans: xFanatical Foresight Elite and Professional (Legacy).
Rule 1: Export user’s organizational unit information
- Sign into xFanatical Foresight with your Google Admin account.
- Go to the Rules page, and click
 button.
 - In the Select a trigger screen, select Manual Trigger.

- Click Next.
- In the Select an action screen, select the List users action.

- In the Edit actions > List users screen,

- In the Columns field, select Email, first name, last name, org unit path and keep all other fields as default.
- Click Review.
- In the Review screen,

- In Rule name, customize the automation rule name.
- Click Create.
- Now, click the
 button for the Export user’s organizational unit information rule to execute it and generate a CSV file containing the detailed user information.
- Once the rule has been executed, download the CSV file from the logs page of the first rule.


Rule 2: Bulk update department information by user’s organizational units
Next, set up a second rule to streamline the updation of user’s department information based on Organizational unit path.
- Click the New Rule button.
- In the Select a trigger screen, select Data Uploaded trigger.

- In the Edit trigger > Data Uploaded screen,

- Select the CSV file you downloaded in Step 9 of Rule 1 to proceed with updating department information based on organizational unit path.
- Click Next.
- In the Select an action screen, select the If action.

- In the Edit actions > If screen,
- Rename each branch according to the organizational unit.
- In the Add condition field, select Org Unit Path as the field, choose text starts with as the operator, and enter the matching OU path as the value for each branch.
- In the Add next action field, select the Update employee department action to update the department according to the OU path for each branch.

- Click on Update employee department action.
- In the Edit actions > Update employee department screen,

- In the User primary email field, select the Email variable from the Data uploaded trigger.
- In the Department field, select the desired department mapped to the organizational unit.
- Click Review.
- In the Review screen,


- In Rule name, enter a rule name.
- Click Create.
- The Automation rule is created.
xFanatical Foresight rule graph illustrating the automated updating of department information based on OU path in Google Workspace.


Verify Automation
To ensure that your rule setup automates as expected, it’s essential to conduct a simple test. The following instructions demonstrate how xFanatical Foresight automates the bulk update of departments in Google Workspace based on organizational unit paths.
- Go to the Rules page.
- First, click the button of Export user’s organizational unit information rule to generate a CSV file containing the latest details of all users.
- Wait until you receive a notification in the top right of xFanatical Foresight. In the notification message, click View log.

- In the Logs > Log details page, download the CSV file from the Rule history section.
- Edit the CSV file downloaded from the Export users’ organizational unit information rule according to the information that needs to be updated.

- Go back to the Rules page.
- Click on the icon and upload downloaded CSV file to the Bulk update department information by users’ organizational units rule.

- Wait for the CSV file to be processed and receive a notification in the top right of xFanatical Foresight. In the notification message, click View log.

- In the Logs > Log details page, the Rule history section explains the automation history and task xFanatical Foresight has automated on behalf of your Google account.

- Sign into your Google Admin Console. and verify that the user’s department has been successfully updated by the automation rule.


Notes
- Once after the admin uploads the CSV file the automation rule, xFanatical Foresight will begin exporting the users’ list and updating their department information based on the OU path.
- If all users within sub-organizational units (sub-OUs) are being matched and updated, and the admin intends to target only a specific OU without affecting its sub-OUs, it's recommended to use the text is exactly operator with case-sensitive matching.
- Each If action can support up to 10 conditional branches. To handle more than 10 OUs, admins can chain multiple If actions by placing an additional If condition in the Fallback branch of the previous one.
- At each time a rule is executed, you will receive a notification in the app telling you how it has happened to your rules and whether rules were automated successfully or not.
- The rule execution and CSV processing may take a few minutes to complete as the system processes the file and updates information efficiently.
Conclusion
Automatically updating departments based on organizational units in Google Workspace with xFanatical Foresight simplifies user management, ensuring accurate department assignments without minimal intervention. This automation not only saves time but also reduces the risk of errors, improving efficiency and consistency across the organization. By streamlining the process, IT administrators can focus on more strategic tasks while maintaining a well-organized and policy-compliant user structure.
Try a 14-day free trial with xFanatical Foresight and manage your tasks.
Related Articles
- Automatically update Organizational Units based on Departments
- Bulk update employees information in Google Workspace
For more article please visit our website: Articles