Introduction
In this article, we will guide you through how to add and delete labels in Gmail to keep your inbox organized and efficient. Managing a cluttered Gmail inbox can quickly become overwhelming, but Gmail labels help you organize emails, group messages by category, and highlight important updates. Whether you want to create custom labels in Gmail, manage work emails, or remove unnecessary tags, labels make it easier to stay in control. In this guide, we will show you step by step how to add labels in Gmail, apply them to emails, and delete labels safely. By the end, you will be able to manage Gmail labels effectively without losing any important emails.
What are Gmail Labels?
Gmail labels are a type of tags that you can apply to your emails in order to organize them. A single email in Gmail can have multiple labels, making it easier to categorize and find important messages quickly. There are two main types of labels namely system labels and custom labels.
System labels are default labels that Gmail automatically creates, such as Inbox, Sent, Drafts, Spam, and Trash. You cannot delete system labels, but you can hide them if you don’t use them. Custom labels, on the other hand, are labels you create yourself, such as Work, Personal, Projects, or Important. With custom labels, you can add, rename, delete, or nest them to organize your inbox exactly how you want.
How to Create Labels in Gmail
Method 1: Manage Labels Directly from the Gmail Home Page
Gmail now lets you create, apply, and delete labels directly from the home page without going into the Settings menu. This makes it quick and easy to organize your inbox, keep emails categorized, and remove labels you no longer need. Follow these simple steps to manage labels directly from Gmail.
- Adding a New Label
- Step 1: Open Gmail
Log into your Gmail account on a desktop browser. - Step 2: Go to the Labels Section
On the left sidebar, scroll down to the section labeled Categories.
- Step 3: Create a New Label
Click the Create new label button.
- Step 4: Enter Label Details
In the pop-up window, type the name of your new label. If you want, you can nest the label under an existing one by selecting the Nest label under option. - Step 5: Save the Label
Click Create to add the new label to your Gmail account. Your label will now appear in the left sidebar, ready to organize your emails.
- Step 1: Open Gmail
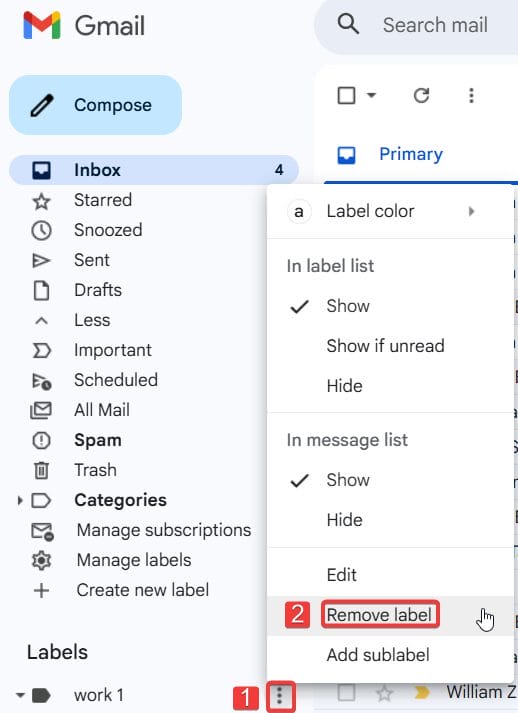
- Deleting a Label
- Step 1: Open Gmail
Log in to your Gmail account using a desktop browser. - Step 2: Locate the Label
In the left sidebar under Categories, find the label you want to delete. - Step 3: Open Label Options
Hover over the label. A three-dot menu icon (⋮) will appear next to the label name. Click it to see more options.
- Step 4: Remove the Label
From the menu, click Remove label. - Step 5: Confirm Deletion
A pop-up will appear asking you to confirm. Click Delete to remove the label. The label will be deleted, but the emails that had this label will remain in your inbox or under other labels.
- Step 1: Open Gmail


Method 2: Manage Labels Using Gmail Settings
Gmail also allows you to create, apply, and delete labels through the classic settings menu. This method provides a full view of all your system and custom labels, making it easy to manage your inbox and keep your emails organized. Follow these steps:
- Adding a New Label
- Step 1: Open Gmail
Log in to your Gmail account on a desktop browser. - Step 2: Go to Settings
Click the gear icon in the top-right corner and select See all settings from the drop-down menu. - Step 3: Open the Labels Tab
In the settings menu, click the Labels tab. Here, you will see a list of system labels and any custom labels you have already created.
- Step 4: Create a New Label
Scroll down to the Labels section and click Create new label. - Step 5: Enter Label Details
In the pop-up window, type the name of your new label. You can also choose to nest the label under an existing label by selecting Nest label under.
- Step 6: Save the Label
Click Create to add your new label. Your label will now appear in the left sidebar. - Step 7: Apply the Label
Select the emails you want to label, click the Labels icon at the top, and choose your new label from the list. Your emails will now be neatly organized under that label.
- Step 1: Open Gmail
- Deleting a Label
- Step 1: Open Gmail
Log in to your Gmail account on a desktop browser. - Step 2: Go to Settings
Click the gear icon in the top-right corner and select See all settings. - Step 3: Open the Labels Tab
In the settings menu, click the Labels tab to see a list of system and custom labels. - Step 4: Find the Label You Want to Delete
Scroll down to the custom labels section and locate the label you want to remove. - Step 5: Delete the Label
Click the Remove link next to the label. A confirmation pop-up will appear. - Step 6: Confirm Deletion
Click Delete to remove the label. The label will be deleted, but the emails that had this label will remain in your inbox or under other labels.
- Step 1: Open Gmail


Method 3: Assign Labels Automatically Using Filters in Gmail
Gmail allows you to automatically apply labels to incoming emails using filters. For example, you can create a filter that applies the Invoices label to all emails from your team. This saves time and keeps your inbox organized without manual effort.
- How to Add Labels Automatically via Filters
- Step 1: Open Gmail on Your Desktop
Log in to your Gmail account using a web browser on your computer. Filters cannot be created from the mobile app. - Step 2: Open the Search Filter Menu
At the top of your inbox, click the small down arrow in the search bar. This opens the advanced search menu, where you can set criteria for your filter. - Step 3: Set the Filter Criteria
Fill in the fields to specify which emails should be labeled automatically.
- Step 4: Create the Filter
Once the criteria are set, click Create filter at the bottom-right of the advanced search menu. - Step 5: Apply the Label
In the next screen, check the box Apply the label. Select the label you want from the drop-down menu. If you don’t have the label yet, click New label to create one.
- Step 6: Apply to Existing Emails (Optional)
If you want the filter to also label existing emails that match the criteria, check the box Also apply filter to matching conversations. - Step 7: Save the Filter
Click Create filter to finalize. Gmail will now automatically apply the chosen label to all incoming emails that match your filter criteria.
- Step 1: Open Gmail on Your Desktop
- How to Remove Labels from Filters
- Step 1: Open Gmail Settings
Click the gear icon in the top-right corner and select See all settings. - Step 2: Go to the Filters and Blocked Addresses Tab
In the settings menu, click Filters and Blocked Addresses to see all the filters you’ve created. - Step 3: Find the Filter
Locate the filter that automatically applies the label you want to remove. - Step 4: Edit the Filter
Click Edit next to the filter. In the filter settings, uncheck the box for Apply the label. You can also change the label if needed. - Step 5: Update the Filter
Click Continue, then Update filter to save your changes. The filter will no longer apply the label automatically.
- Step 1: Open Gmail Settings


Use Color Codes to Manage Your Labels Easily
Assigning colors to labels helps you quickly identify different categories of emails at a glance. For example, red for urgent emails, blue for personal emails, and green for projects. Colored labels make scanning your inbox faster and more intuitive.
- Step 1: Open Gmail
Log in to your Gmail account on a desktop browser. - Step 2: Locate your label
In the left sidebar, scroll down to the Labels section. Find the label you want to color-code. - Step 3: Open label options
Hover over the label name. A three-dot menu icon (⋮) will appear next to it. Click on this icon to open the options menu.
- Step 4: Choose a label color
From the menu, select “Label color.” You’ll see a palette of default colors. Click on the color you want to assign to your label. - Step 5: Apply a custom color
If you want a color that isn’t in the default palette, click Add custom color.. Pick a color for the label background and a contrasting text color, then click Apply. - Step 6: Done
Your label is now color-coded. All emails with that label will display the chosen color, making it easier to identify them at a glance.

Conclusion
Managing Gmail labels effectively can save you time and keep your inbox organized. By following the steps in this guide, you can easily add, apply, and delete labels using both the home page and traditional settings. Remember to use nested labels, filters, and colors to streamline your workflow and quickly find important emails. Start organizing your Gmail today and take full control of your inbox.
xFanatical Articles -
- How To Delete All Emails From One Sender?
- How To Recover Emails From Gmail.
- Know All About How To Create Filters In Gmail
For more article please visit our website: xFanatical Articles